Squad Leader
Squad leaders are super important for winning the game. Not only do they place crucial spawn points (rallies & FOBs),but they also have communications with the other squads; extra information that can aid them in calculating the squad’s next move. Squad leading could be a huge guide of its own so I tried to regroup some of the most important fundamentals that have the biggest impact on the game.
Make sure everyone is playing for the same goal. You generally want to avoid players just doing their own thing away from your squad’s goal (for main infantry, except if they are filling a special function). Every individual will have a different playstyle, and the squad will need to make sure all these are put together for the same goal. The goal could be executing a HAB take, defending a flag, capturing a flag, etc. Using an example of attacking an enemy hab, below are some examples of what players could be doing to contribute to this common goal (in order of aggressivity):
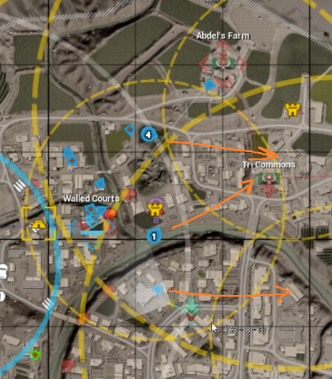
- Finding gaps and shoving: Utilising good game sense, this player found an area that is not covered by the opponent and punished the enemy for this open ground by shoving ahead of the squad. Usually, this shover will be the first one on the HAB. Inexperienced teams often play heavy on the flanks; the gaps could often be found in the wide-open centre or along the lattice lines. The player who aggressively finds gaps and shoves is usually very confident. Once on the HAB (and it is blocked by other friendlies that have caught up), this player will remain the tip of the spear by continuing the push to buffer out and stomp backup rallies / returning enemies from different angles.
These 3 players could be in the process of finding/abusing a gap in the enemy (orange lines)
- Poking holes: This player found an area that was covered by enemies, and killed them. By doing this, they are poking holes in the defence of the enemy. By using good game sense, the player can then decide whether or not to shove through this potential gap (utilising aforementioned notions of tempo and momentum) to get onto the HAB / past it.
video of player Rehtori poking a hole
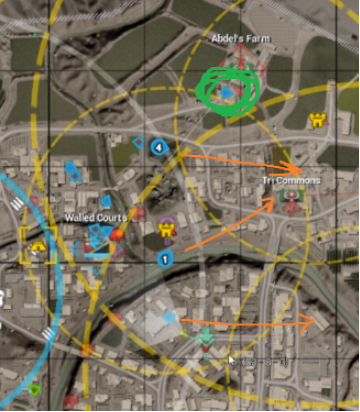
- Crossfiring/overwatch: This player is often playing in a separate lane and covering your squad from there (crossfire) or he is sitting from afar and covering (overwatch). I feel like the best kit to accomplish this is the machine gunner or an optic player that has a more methodical playstyle. In this situation, at the start of the HAB take, this player could be farming the HAB from afar. Once his squad is on the HAB, this player would be sitting on a hill overlooking the HAB and areas enemies could run back from to retake the HAB. This player adapts a more analytical & methodical playstyle.
By looking south, the player circled in green could be overlooking his squad from another lane
- Anchoring: Once on the objective, this player will usually sit on it and hold a more passive angle. They could be the one shovelling the HAB and moving to re-frag / gain ground off the players that were more aggressive. When utilising two medics, the best player for this kit is the scope medic (when he dies he is a quicker/easier revive for the other medic). This player adapts a more methodical playstyle.
- Lurking: This player will purposefully ignore enemies and disengage (will call them out of course) in order to sneak by with the intention of getting behind the enemy and stomping the rally point/getting info. Afterwards they can abuse a gap and keep pushing or wrap back towards the rear of the enemies to help the rest of the squad get through.
- Pocket medic: This player is closely prioritising key players as a medic; acting as a skill amplifier by making sure the player that is being pocketed is constantly alive and in full health. A very important part of the squad, this player is usually playing the ironsight medic and has to adopt a very passive playstyle (see medic section about being the last one to die). The only times they will have to use their weapon is to refrag in short-mid range combat.
- The solo medic attacking a flag 2km away from your squad (useless, kick from squad)
- Et cetera
The squad leader ensures to minimize travel time between tasks/objectives. You can do this by using a vehicle to travel (APC, heli pickup, etc.).
The squad leader’s number one priority is to constantly have a rally point online. When placing a rally, you want it to be up for the whole game (a good rally) by using the fundamental ideas mentioned in the spawns section. Don’t be afraid to put it further, usually the benefits of a close rally is not worth the cons of running for an extra minute by placing the rally point 300 meters further.
When the rally is placed, you must always have a rally point in your inventory. Always make sure to rearm off your vehicle or rifleman after placing the rally point so that you don’t get caught with no ammo later in the game when your riflemen are dead and your vehicle is nowhere to be found. Always be moving to place a better rally for your objective (situational, your rally could be left behind as an anchor or sensor). When flanking to have a better rally, move with a 2nd guy (usually a medic) while your squad draws fire. The rally can also be rotated by using a small armoured piece such as a TIGR or MRAP. By doing this, you could suddenly have your full squad spawning behind the enemy and induce panic.
Abuse rally scanning. When your rally is placed and you have another one in your inventory, you can use it to determine if there are enemies within 50 meters. The first thing the game checks for when placing a rally is if there are enemies, and if there are none, a timer will not be applied. You can keep using your rally point (make sure there is no one around you or it will accidentally place a rally) as a scanner to see if there are enemies nearby. A timer will be applied if there are hostiles in the vicinity. If you do not predict needing another rally and don’t care for the risk of getting placed on a placement timer, there is no reason not to abuse rally scanning to get an idea of where the enemies are. This technique is especially useful for foliage maps where people are just proning and waiting for you.
Demonstration of rally scanning
When fighting with your rally as the primary spawn, ensure that your squad is spawning in sync (makes it easier to fight for the same goal when everyone is spawning together).
Pay attention to the big picture (everyone’s job but specifically squad leader). Mention suspected gaps and timings. If players are not taking initiative to do certain tasks (such as abusing gaps, etc.) you will have to micromanage. Watch how the other squads are moving.
Ensure you are not tunnel-visioned on your objective. You can do this by paying attention to the other lanes around you and crossfiring (hope that they do the same for you or sending one of your own players to go crossfire on their behalf.
This is another thing that is everyone’s responsibility but often you will have to micromanage it as a good squad leader: coordinating explosives. Hard to reach areas can be hit by explosives such as mortar, vehicle, GL, LAT. If you kill someone in a building, they will probably be reviving and you can get the dead-dead with explosives.

